Japanese | English
header
header

Getting Started with Cubase 14: A Beginner's Course

Cubase 14 operation guide (beginner course)

This page is designed as a simple usage guide and beginner's course for those who are using Steinberg Cubase for the first time.

This guide assumes the following environment:

  • Required Cubase: Cubase Pro 14
    (Cubase must be installed and activated)
  • Platform: Windows 10 Home 64bit

Although this content is a guide for Cubase 14, it should also be useful for earlier versions.

For screens that have not changed from Cubase 13, images from the "Cubase 13 Operation Guide" are reused.

Site Search


Article Categories

Related information

  • Below is a collection of articles about Cubase 14. Those who have used previous versions may find the information useful.
    CUBASE 14

Workflow of Music Production Using Cubase

  • In Cubase, you create a project for each song.
    (In this guide, for convenience, we further separate the workflow into two projects: one for “Recording/Programming to Mixdown” and another for “Mastering.”)
  • In Cubase, you create a track for each vocal or instrumental part.
  • Vocals and instruments like guitar are recorded on audio tracks. For programming, MIDI data is entered into instrument tracks (Note 1) using a MIDI keyboard or mouse.
  • In practice, the boundary between “recording/programming” and “editing each track” is often blurred—you will move back and forth between these processes many times.
  • In this guide, pitch and timing corrections for vocals and guitars are considered part of the editing process, not the mixing stage.
  • Mixing refers to adjusting the balance and sound of each track to create what is commonly known as a Mixdown file (stereo mix).
  • Mastering is the process of making final adjustments to the Mixdown file (stereo mix) according to how the song will be released. The resulting master file is then used for CDs or imported into video production software.
Note 1: Cubase also includes MIDI tracks, but they are not used in this guide.
Work Flow


1. Create a Project (30 min)

Here we will create an empty project with basic settings.

(1) Start Cubase
(2) Audio driver settings
(3) Creating a new project
(4) Save the project and close Cubase.
(5) Start Cubase, reload the project, and make basic settings

2. Basic environment checks you should perform (30 min)

Here are some environmental checks that we recommend you do first.

(1) Check that Cubase can produce sound
(2) Check if Cubase is ready to record audio
(3) Check if Cubase is set up to record using a MIDI keyboard

3. Get used to the basics of Cubase by inputting MIDI (120 min)

Let's learn the basics of Cubase by recording about 4 bars of music. Here, we will use only HALion Sonic 7 as an instrument (VSTi).

(1) Setting the tempo and MIDI recording mode
(2) Creating a drum track and simple input (4 bars)
(3) Creating a bass track and simple input (4 bars)
(4) Creating a piano track and simple input (4 bars)
(5) Creating a string track and simple input (4 bars)
(6) You can easily operate the app (use frequently used shortcuts)

4. Import the original audio for instrumental or transcription reference (10 min)

Here, we will load an audio file of an instrument (karaoke) or an original sound source for ear copying into the project and create an audio track.

(1) Mute unnecessary tracks
(2) Loading an audio file
(3) Make sure the audio track can be played

5. Create a tempo track from the imported instrumental or reference audio (10 min)

Use Cubase's "Tempo Detection" to create a tempo track from your audio events.

(1) Check that the metronome click is not in sync
(2) Automatically generate a tempo track from audio events
(3) Adjusting the beat
(4) Tempo Track Editor
(5) Delete the tempo track and the signature track in the project screen

6. Create a chord track from the imported instrumental or reference audio (10 min)

Creates a chord track from audio events.

(1) Create an empty chord track
(2) Detecting chords from audio events
(3) Play piano or strings on the chord track

7. Separate the instrumental and vocal parts from the reference audio (20 min)

Use SpectraLayers, which comes with Cubase, to separate the orchestra and vocals from the original audio source that you copied by ear.

(1) Separate the original track and vocals using SpectraLayers
(2) Separate the orchestra and vocals into audio tracks
(3) Stop using SpectraLayers on the source material for ear copies

8. Using Loops & Samples (30 min)

Let's try using the loops and samples that come with Cubase.

(1) How to open loops and samples
(2) Media Type and Preview Section Settings
(3) How to incorporate Loops & Samples into your project
(4) Checking after work

9. Move on to detailed MIDI programming (after the initial sketch) (120 min)

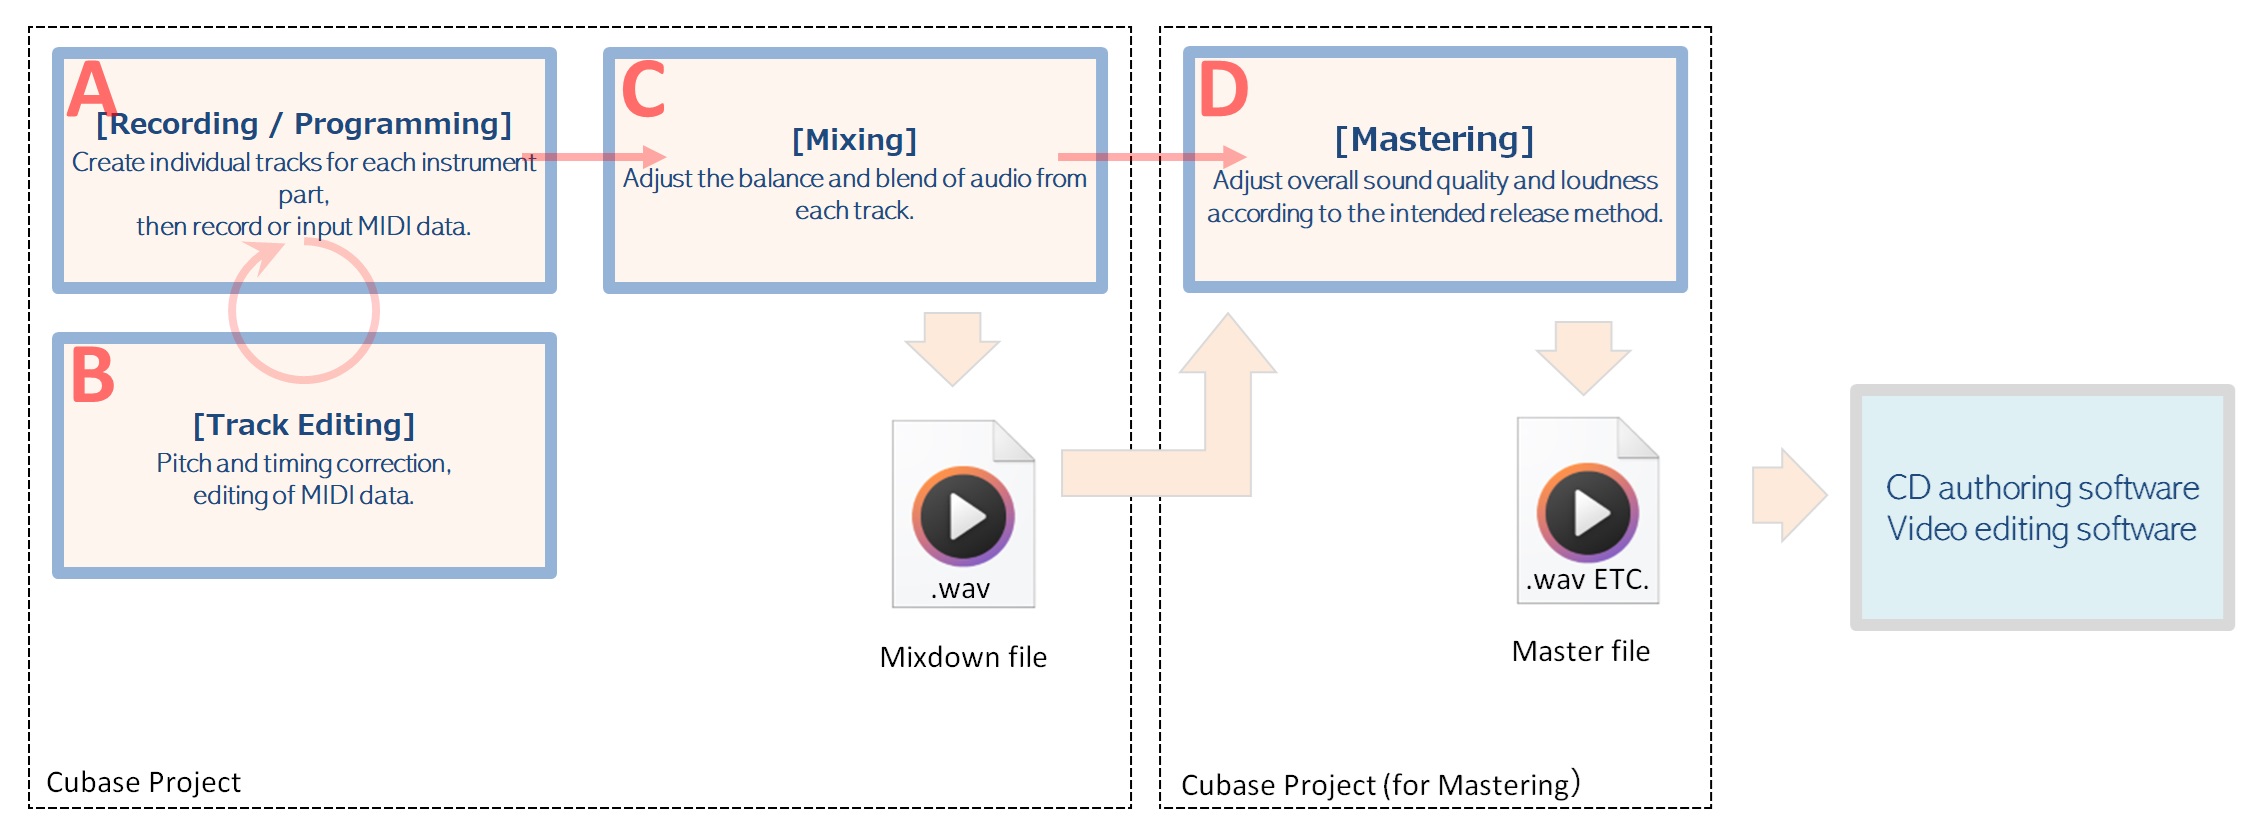
Here we've put together some information that may be useful for you to get started in earnest.

(1) Using Groove Agent SE
    A. Individual drumming
    B. Entering a preset pattern
    C. Paste a preset pattern into a track and edit it
(2) Using PadShop
(3) Using Retrologue
(4) How to use Folder Tracks
(5) Stop using the lower zone on a regular basis
(6) Edit parts (delete, cut, extend, split, move, copy, etc.)
(7) How to improve your ear copy skills
(8) How to record original songs
(9) Let's say you're done typing.

10. Recording vocals and guitar (60 min)

Record vocals and guitar. In this example, the vocals are recorded in mono with one microphone, and the guitar is recorded in stereo through an amp simulator.

(1) Metronome, recording mode (common, audio) and audio connection settings
(2) Recording Vocals
(3) Recording the guitar

11. Correcting Vocal Pitch and Timing (VariAudio) (60 min)

Let's try correcting the pitch and timing of the vocals using VariAudio, a feature of Cubase.

(1) In case you can't restore it
(2) Activating and setting up VariAudio
(3) Monitoring methods and auditions
(4) Pitch correction
(5) Timing correction
(6) Bypassing correction in VariAudio
(7) Cancellation of amendment
(8) Making the results of amendments permanent (freezing)

12. Correcting Guitar Timing (Free Warp) (60 min)

Let's try correcting the guitar timing using Cubase's Free Warp function.

(1) In case you can't restore it
(2) Activating and configuring Free Warp
(3) Monitoring methods and auditions
(4) Timing correction
(5) Bypassing Free Warp correction
(6) Cancellation of amendment
(7) Making the results of amendments permanent (freezing)

13. Adding Harmony to Vocals (30min)

Let's try adding harmony to pre-recorded vocals

(1) Manually adding harmonies using VariAudio
(2) Use Cubase's Generate Harmony Voices feature

14. Monitoring using the Control Room (10 min)

Here we will enable monitoring using the Control Room.

(1) Changing the audio output settings
    A. Changing the audio connection settings
    B. Control Room Settings
(2) Adjusting the monitor volume
(3) Adjusting the metronome click volume

15. Mixing Settings (120 min)

This is the mixing step to create what is known as a "2MIX." It will then be formatted as a musical work.

(1) Situation management before starting work
(2) Adjusting the volume and panning of each track
(3) Put the drums on a bus and run them through a compressor
(4) Put strings, pads, etc. on a bus and cut the low frequencies with EQ
(5) Create an FX channel track for the effect send and adjust the send amount from each track individually.
(6) Applying spatial effects to mono vocals
(7) How to make a stereo track sound mono
(8) Run the whole thing through a compressor
(9) Comparison with reference sound source
(10) Setting results
(11) Summary of functions used so far

16. Drawing Automation (60 min)

Changes in volume and movement of the sound image during a song can also be achieved by automating mixing operations.

(1) Draw volume automation on a group channel track
(2) Draw volume automation on an audio track
(3) Draw automation such as panning
(4) Automation Panel
(5) Copying automation events

17. Export the stereo mixdown (30 min)

Export the mixed audio to an audio file. In Cubase, use the Audio Mixdown function to export in this case.

(1) Audio flow (routing)
(2) Exporting 2mix
(3) Analysis of the exported results
    Key points for 2mix analysis
(4) Re-export

18. Mastering (60 min)

There are many different opinions on "What should be done in mastering?", and it is a difficult question.
In this guide, we will take a 2mix created with peaks suppressed to about -6dB, and raise the loudness value to about -14.0 to 13.5 LUFS, assuming it will be uploaded to social media.

(1) Creating a project from a template
(2) Setting up the project
(3) Mastering
    A. Preparation for mastering
    B. Plugin Settings
    C. Exporting (audio mixdown)
    D. Precautions
(4) Check the mastering results
(5) Mastering (2nd time)
(6) Mastering (3rd time)
(7) Location of files after work

19. Organize your project folders for archiving (30 min)

After your song is complete, you may want to free up unnecessary resources when copying the project to another medium for long-term storage...

(1) Back up Project
    A. Things to keep in mind
    B. Create a backup copy of your project folder
    C. Start the target project
    D. Remove unused clips from the Pool
    E. Performing a backup of your project
    F. Compare the old and new project folders